
How to Crop a Layer in Photoshop
Layers and the crop tool in Photoshop are two of the best reasons to use the software. Therefore, you might think the two features would play well together. If you've ever tried to crop a layer in Photoshop, however, you've found out that just isn't true. And there is a good reason for that.
In this article, you'll find out why there's no way to use the regular crop tool on a layer. However, you will also learn how to “crop” a layer in Photoshop using different tools.
Get my eBook: 25 Techniques all Photographers Should Master - for Free
How the Photoshop Crop Tool Works
There's a very good reason why you can use the crop tool, to crop individual layers. "Cropping" a photo dates back to the days of film photography.
The tool was created to match this process as closely as possible with the increased precision that comes with digital photo editing, so you can achieve a pixel-perfect crop. That means it was programmed to work on the whole image or the entire canvas.
Why is There No Crop Layer Tool in Adobe Photoshop CC?
Although you can't crop layers, you can other tools that can be applied to layers. Using these, you can isolate part of a layer, as well as remove unwanted portions of the layer. You can do so without affecting other layers or the canvas itself.
Let's look at a few methods to crop a layer:
Method #1: Cropping with the Marquee Selection Tool
For this method, you'll use the Marquee tool, which gives you two options: a rectangular marquee tool or an elliptical one. You'll find it toward the top of your Toolbar. By holding down your mouse button on the icon, you can select the option you prefer.
Step 1: Select the Right Layer from the Layers Panel
First of all, make sure you are working on the right layer. If you use the background layer, make sure you unlock it first.

Unlock background layer
Step 2: Create the Selection using the Marquee Tool
Quick Tip: You can simply press the keyboard shortcut M to select the marquee tool with the option that was elected last!

marquee tool in PS
Once you've selected the option, hover your mouse over the point where you'd like to start your selection. Hold down the button and drag the mouse in any direction to create a selection. Enclose the area you want to keep.
Selection Tip 1: Press and hold the Shift key while dragging to create a perfect square or circle.
Selection Tip 2: To reposition the entire selection, press and hold the spacebar while dragging with the mouse.
When you release the mouse button, you'll see a dashed line around the perimeter of your selection that appears to be moving. These little dashes are known as "marching ants". They indicate that this is the active selection, meaning whatever actions you perform will only affect that area of the layer.
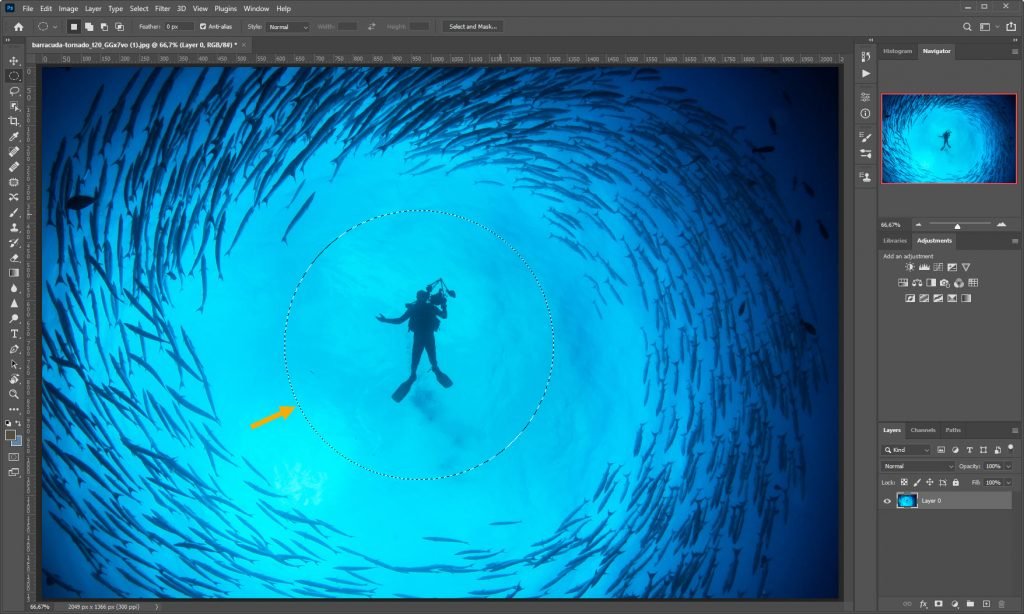
marquee selection in PS
Step 3: Delete or Hide the Unwanted Area
Now you're ready to remove the portion of the layer you want to "crop out", leaving the portions you want to keep. Your next step will determine that portion is permanently deleted or you simply hide portions of the layer, to allow for possible changes later.
Hiding Parts of the Image using a Layer Mask (the recommended method):
To retain, but hide the portion you're "cropping out," you can create a layer mask using the current selection. Click on the layer mask icon, located at the bottom of your Layers palette.

Crop Layer in Photoshop using layer mask
The contents of the active selection will disappear and a layer mask will appear beside the thumbnail of the layer. The black area of the layer mask hides that portion of the layer without removing the contents, so changes can be made later.

deactivate layer mask
Deactivate the layer mask to reveal the hidden or "cropped" area of the layer
Permanent Deletion:
If you're sure you won't want to use the selected portion, start by pressing Ctrl/Cmd+Shift+I to invert the selection.
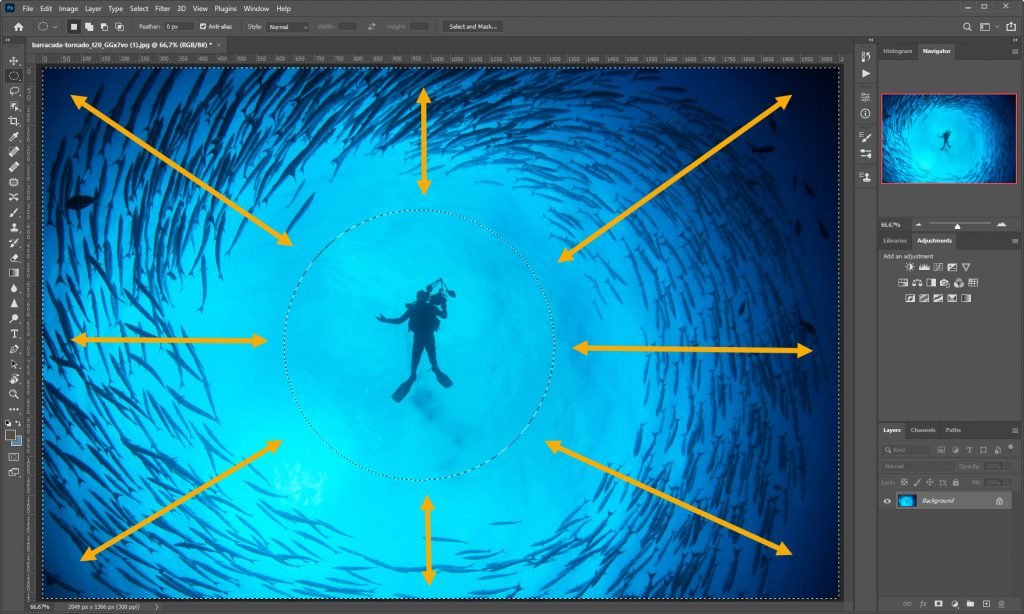
Inverted selection in PS
The arrows indicate the selected area (between to outer and inner marching ants.)
You'll notice the marching ants now enclose the area outside of the original selection. Press Delete to erase the current selection. Press CMD/CTRL + D to remove the selection.
If no layers with content are visible below this one, you'll see a transparent area around the content you wish to keep. Otherwise, the first visible layer below the current one will show through.
NOTE: These deletion/masking procedures will be the same for the upcoming method. Only the selection procedures will be different.

Method #2: Cropping a Layer with the Pen Tool / Lasso Tool
When you want to "crop" a layer using a more intricate selection, the pen tool lets you create it. You can use it to accurately trace portions of the layer or create your own freeform selection for the border of your crop.
We could also use the Lasso Tool or any other selection tools. However, we will use the Pen Tool in this example.
With this tool, you'll outline a "path" by clicking to create points along the path. Each of these "anchor points" is adjustable, to allow you to alter the shape of the path that connects them.
Step 1: Select the Pen Tool
From the editing window, click on P or select the pen tool from the toolbar. If you prefer

Pen tool in Photoshop
Step 2: Start Tracing the Edge of your Subject
Clicking anywhere in the image will create a small block indicating a point.
Click on another spot to create a second point, and a line will be created between the two.
If you want to join two points with a curved path, click and drag when you create the point. You can then drag the endpoints of the line that appears on the new point to adjust the curve as necessary.

trace edge with the pen tool
Step 3: Finish the Path
Continue to create points until you're ready to complete the path. You'll need to close the path by moving your cursor from the last point you created to the beginning point of the path. When you see a small circle appear next to the cursor, click the mouse and a line will be drawn completing the path.

finish tracing with the pen tool in photoshop
Quick Tip: You can move any point on the path by holding Ctrl/Cmd and dragging the point.
Step 4: Change the Path to a Selection
Right-click inside of the path and select "Make Selection" or click on "Selection" beside the Make in the Options Toolbar.

make selection
Set "Feather Radius" to zero and click "OK. You'll see the marching ants confirming the new selection.

make selection dialog
Optional Step 5: Invert the Selection if you Want to Crop the Opposite
Remember if you have created a path around the thing you want to keep, go to Select > Inverse to invert the selection.

inverted selection
Step 6: Select the layer and Delete/Mask out the Selection
Click on the layer you want to "crop" to highlight it, and follow the deletion or masking procedure as described inMethod #1 - Step 3.

cropped layer in Photoshop with black background
Cropped layer with a black background behind it.
Method #3: Use the Crop Tool on a Smart Object
If your fingers really itch to use the crop tool on just one layer, there is actually one way to do it. In the sample screenshots below we will demonstrate it by putting two images together side by side with a slice of white background visible as the posters divider.
Step 1: Convert the Layer to a Smart Object
From the Layers Panel, right-click on the image layer you want to crop and select Convert to Smart Object.

right click

convert to smart object
Step 2: Double click on the Layer to Edit the Smart Object in a New Document
When you double click on the correct layer that you just converted it will open up on a new Photoshop document.

double click on thumbnail
Step 3: Crop the Smart Object using the Crop Tool
Select the Crop Tool (C) and crop the image. Press enter to apply the crop. Press Cmd/Ctrl + S to save the document. When you save smart objects, the original document containing the smart object is automatically updated.

updated and cropped layer
(Step 4: Adjust the Position of the Cropped Layer using the Free Transform Tool)
After saving smart objects using this method, you might need to reposition or scale the smart object layer using the Free Transform tool or the Move tool.
Use the free transform tool to reposition the cropped layer
Alternative Methods for Cropping a Layer
Some tutorials highlight that you can use the shape tool or the custom shape tool to crop a layer. Well, you can't directly, but you can create a new shape layer, hold Cmd/Ctrl + click on the shape layer thumbnail, to make a selection from it. From there you can invert the selection and remove the part of the layer that you don't want to keep using layer mask as described in method #1 step 3. However, using a shape layer is mostly relevant for graphic design.
Related Photoshop posts:
Summing Things Up
Now you have learned a couple of different methods for how to crop a layer in Photoshop. "Cropping" doesn't really apply to layers in Photoshop. However, there are times when you may want to eliminate part of a layer in a similar way, either by deleting areas of a layer or by applying layer masks to hide areas of a layer in Photoshop.
Using the methods above, you can use Photoshop to crop a layer only. You can even get a little more creative with the results! However, cropping an image in Photoshop is far more simple than cropping a specific layer.
How do you "crop" a single layer in Photoshop? Let us know in the comments below.