
How to Choose The Best Flash for Macro Photography
Flash has multiple roles in macro photography and close-up photography. It allows you to work with a smaller aperture and have a deeper depth of field and better framing.
It provides enough light to freeze movement so you can have sharper photos even without using a tripod. And it gives you more options for creating interesting compositions in your nature photography.
Download my Beginners Guide to Macro Photography - for Free!
One of the best tips for macro photography is to add a flash to your macro setup.
However, flash is tricky. There is an internal flash on almost every camera but not many photographers use it.
The internal flash is completely useless for macro photography because the macro lens is so close to macro subjects that it will cover light coming from the internal flash. If you use it wrong, it will ruin your photos.
If you are not used to using artificial light in your photography, it can seem daunting at first, but it is not so difficult, once you find the right light setup that works for your macro photography.
If you use it right, it can deliver amazing results without anyone knowing you used flash. Furthermore, there are dedicated flashes for macro photography, which can be pricy, but they are often worth it because they are designed to give you optimal results in macro photography scenarios.
Some mount directly on the front of your macro lenses, while others use flexible arms to get the light source closer to the subject. Some are manual flash types, while others are automatic macro flash with TTL.
What you should look out for is the flexibility you have to create the light quality, direction, and soft natural look that you need for your photography.

Internal flash with a homemade diffuser
So what if you don’t want to invest in new equipment or carry extra weight? You can always use the built-in flash of your camera.
Internal flash has the advantage of being present anywhere you go but has some disadvantages too. To start with, it has a fixed position, behind the lens, and sometimes you get so close to your subject that the lens blocks the light coming from the flash.
The built-in flash has a strong, unidirectional light that can wash out your subject’s colors, overpower ambient light, and produce artificial-looking results. However, there is a way to achieve good results with a built-in flash.
First, use the flash in manual mode and adjust its power to each scene. Then, use a light diffuser to make the light softer, less powerful, and more natural-looking. Instead of a straight beam of light, you’ll have an evenly spread flow of light.
You can buy a light diffuser for a reasonable price but you can also make it yourself or improvise on the spot. There are plenty of DIY tutorials that can teach you how to craft a diffuser from cardboard and white paper, plastic cups, and other materials. As the last resort, you can improvise a diffuser from a white tissue.
The stylish homemade flash diffuser from thecraftingnook.com and the improvised tissue flash diffuser made on the spot
External flash with a diffuser
As mentioned the built-in flash doesn't work for macro photography. Its fixed position is the main reason for which most photographers choose an external flash.
An external flash provides more flexibility. You can mount it on the camera using the hot shoe mount like a built-in flash. But it rotates both vertically and horizontally so you can change the angle of the light beam. However, you can still experience the macro lens casting shadows on your subject. However, a flash diffuser can help you overcome this issue. Or you can use it off-camera and trigger it remotely, which changes the position of the light entirely.
An alternative solution is to use flash brackets or other mounting systems where you mount the external flash on a bracket and thereby fixate the flash a little away from the camera body.
With an external flash, you can illuminate the subject from lateral or from behind and create more interesting compositions. Macro photographers usually depend on the position of the sun and weather. If you choose an external flash, you can take pictures at any time of the day and in all weather conditions.
Besides flexibility, an external flash has another big advantage for macro photography: Flash is extremely fast, overriding your shutter speed. Take for example Nikon SB-700 Speedlight, even though your shutter speed is at 1/250, when setting the flash output level to 1/128 you get a flash duration of 1/40,000 seconds. Even at 1/20,000 seconds is enough to freeze a moving subject in flight. Often less light output will give you the best and natural-looking results.
Nikon SB-700 Speedlight has other interesting features such as three illumination patterns and i-TTL Balanced Fill-Flash with Nikon Creative Lighting System compatible cameras.
If you’re ready to carry an extra 360g and pay around $300, this is an external flash to consider.

External flash: Nikon SB-700 - Nikonuse.com
As with the built-in flash, you need a light modifier or diffuser to spread the light evenly and make it look soft and natural. You can choose a custom-made diffuser for Nikon AB-700 Speedlight such as JJC SB700 Professional Bounce Diffuser or craft one by yourself.
Alternatively, you can buy separately a bracket for twin flash and two flash units (external). However, the entire off-camera flash system with two flashes will be heavy and expensive.

Ring Flashes
A macro ring flash is a circular flash that fits around the lens. A ring light flash has a couple of advantages over an external flash, which makes it one of the preferred flash options for macro photography.
First of all, a ring flash provides even illumination and not a beam of light. The subject will be surrounded by light in a very natural way even if the source of light is very close to the subject. Then, because the source of light is attached to the lens, you can’t cast shadows over the subject.
A common issue with an in-built flash or an external flash mounted in the hot shoe, is that the lens cast a shadow over the subject when firing the flash. This doesn't happen with the ring flash as it is mounted on the front end of your macro lens.
A ring flash helps us place the source of light where it should be, near the macro subject.
Choose a ring flash compatible with your lenses, with high flash sync speed, that works both in manual mode and TTL mode, and has a small guide number.
Compatible with Nikon cameras, Canon cameras, and Sony cameras, Nissin MF18 is a good ring flash option for macro photography (MF stands for Fine Macro technology). It provides high-speed sync in TTL mode, a guide number of 16, adapter rings for lenses from 49 mm to 82 mm, and wireless remote flash. It costs approximately $300 and weighs 446 g.
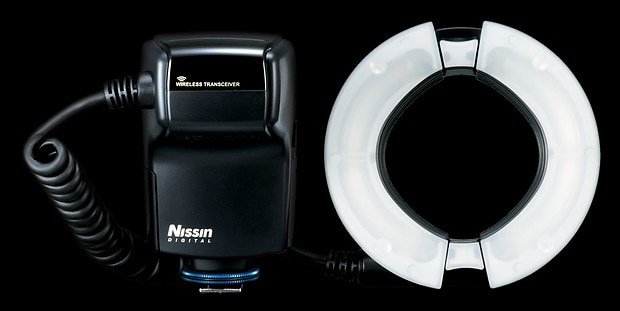
Nissin MF18 - nissindigital.com
Twin macro flash mounted on the lens front
What a macro flash can do, two flashes can do better. While it may be interesting to take photos with an external flash, you don’t always have the time to set up the entire lighting system. Insects usually don’t wait for you too long. So you want a versatile system that gives you more control over the lighting without thinking too much about it.
A twin macro flash mounted on the lens front provides the surrounding light of a ring flash and more. The dual flash units can usually rotate on the front of the lens, giving you more flexibility to position the light source according to the natural environment, where you shoot. A twin flash system also gives you the ability to play more with side lighting than ring lights.
The two flash units can be fired together or independently. Therefore, you can have lateral light without needing an external flash. This twin macro flash system may be everything you need for macro photography.
For example, Canon Macro Twin Lite MT-24EX has a guide number of 24 (12 for each individual flash), high-speed sync, manual and TTL mode, and wireless flash. But it costs around $500 and weighs 585g.

Canon Macro Twin Lite MT-24EX - canon-europe.com
Both Canon users and Nikon users can find original macro twin flashes and ring lights, and normally you can use these kinds of systems on both Nikon macro lenses or Canon macro lenses as they have the same filter threading. So even though you switch camera brands, your front-mounted flash should still work.
Twin macro flash with flexible arms
If the fixed position of the twin macro flash system isn’t exactly what you want, choose a system with flexible arms. It still provides a source of light between the lens and the subject but it also gives you more freedom to choose the position of the light. The twin macro flash system with flexible arms is mounted on the camera via the hot shoe. The arms can have a length of around 30-50 cm, which gives you enough space to position them anywhere around the subject, and often even illuminate the background.
A twin macro flash with flexible arms has other features too. For example, Venus Macro Twin Flash KX-800 allows you to adjust the power of each flash independently, features a combined guide number of 58, costs under $300, and weighs only 450g.
The Venus Macro Twin Flash is a manual flash system though, so no help from TTL (Through The Lens data). However, I have never found that to make it more difficult to use, you just have to fire a couple of test shots, and adjust your ISO, and you are ready to go.
My go-to camera setting is a shutter speed of 1/250 and ISO 400 with the flash set to 1/128 - 1/64 flash power for natural-looking light / fill light. If the composition requires more light, I will bump up the flash power a bit.
However, so far, I have never used it on full power, as it always gives hard light.

Venus Macro Twin Flash KX-800 - venuslens.net

Continuous Lighting?
An alternative solution to using flash is to go for a continuous light system, which is easier to control, as what you see is what you get. However, they are often less mobile and require an extra set of free hands to position, if they are not mounted on your camera. I believe that continuous lighting is best used for studio purposes, where you may also want to experience and get more creative with the lighting and try out a different color temperature.
Concluding words
Macro photography needs flash. Whether you want to increase sharpness and clarity, reduce the risk of blurred images, use a deeper depth of field, create artistic effects, or just get enough light, flash is a useful and versatile addition to your gear.
Dedicated macro flash units may be expensive. However, keep in mind that you only have to buy them once and most of your photos will be using flash. Imagine how many wildflowers, insects, droplets, and snowflakes you’ll be able to photograph when you control the source of light.
If your budget doesn’t allow it, learn to control the built-in flash of your camera and craft a diffuser to create the soft light that is sought after in almost any photography genre. Position the camera parallel with the subject and avoid as much as possible casting shadows over the subject.
Macro photography requires patience and calm. Use the ambient light in your favor, but don't be afraid to add artificial lighting when required. Most of all, keep in mind that using flash isn’t a requirement. It’s just an option for when you don’t get enough natural light or you want to block the ambient light for special effects.