
How To Use Photoshop Actions For Batch Processing
Photoshop Actions are powerful at helping you speed up processing your photos in Photoshop. However, with the power of batch processing in your Photoshop actions can become even more effective in helping you to make the most of your time.
Even though Photoshop actions can help you a great deal in saving time and clicking when editing a single image, you will still have plenty of work ahead of you, if you need to process hundreds or thousands of photos.
Get my eBook: 25 Techniques all Photographers Should Master - for Free
However, Photoshop has a special feature to help you with this specific problem. It is called batch processing. With batch processing, you can tell Photoshop to apply a particular action to a whole batch of photos in one go.
In this quick tutorial, we will show you how to create an action in Photoshop and then make Photoshop apply it to a batch of photos. We will also show you how to make Photoshop apply multiple actions to each of the images you want to process as a batch.
This is part of the guide: How to Use Photoshop Actions
Create The Photoshop Action To Use for Batch Processing
Before we can set up Photoshop to batch process an entire folder of images, we need to create the Photoshop Action first. If you have purchased professional Photoshop actions, you will likely be able to use these for batch processing.
Note that to keep track of your Photoshop actions better, you should put the action inside a specific Action Set. It makes it easier to both find it and export it if you ever need to use it on other computers. So if you don't have an Action Set to store your custom Photoshop actions, you should create an Action Set first.

New Photoshop Action Set
To create an Action Set, click on the new folder icon at the bottom of the Actions Panel.
Create a Resize Image Photoshop Action
In our case, we will create a simple action that change the image size of your photo.
To create the Photoshop action, begin by opening one of the files that you want to work with. Open the Actions Panel in the right sidebar.

create new action button
Click on the Create New Action button. Give the action a distinct name, so you can easily find it again. In our example, we will use the name "Simple Resize."

Create new Photoshop Action
With the new action selected, click on the Record button in the Actions panel. Now that the action is recording, we can begin to do the steps we want the Photoshop action to perform each time we run it. In our case, we want it to resize the image to a specific size.

A simple action for resizing images to 1200px in width
Navigate to Image > Image Size, and select the dimensions you want the resized image to have. In this example, we will use a width of 1200px. Keep the link between the width and height enabled to constrain the aspect ratio. This will make Photoshop adjust the height accordingly, so the image keeps its original proportions, but with a width of 1200px.
Click on the Stop button at the bottom of the Actions panel to stop recording your steps in Photoshop.
If you want to process the image more with this Photoshop action, you can continue to record your edits. However, the more things you add within a single Photoshop action, the fewer images you will be able to use it on.
Let us say that that the images you are currently creating this action for should also have a border. If you include the border in this action, then when you want to use a Photoshop action for creating a border, but without resizing, you cannot use this action anyway. So the reasonable thing to do it to record two separate actions.
Right now, we have an action that resizes the image to the chosen size. However, if we run this action as in a batch process, it will open and resize the images, and close them again without saving them.
So we need to tell Photoshop to record a step for saving the image.
Most tutorials about Photoshop actions would tell you to record the action as a final step of the action we just recorded above. However, I suggest that we do it a bit differently. Once again, I like to be able to reuse what I do as much as possible. I don't know if I always want this resize action to save the image as a .jpg-file. The next time, I might want to save the image as a .png-file or a .tiff-file.
I know it is a bit more complex to separate things into separate actions, but if you use Photoshop actions extensively, you will be happy later on for using this method. If you want to include the next steps in the previous resizing action, feel free to do so. In that case, you should just continue to record the steps using the "Simple Resize" Photoshop action.
Create a "Save As" Photoshop Action
Let us create the action to define the saving settings.
Click on the Create New Action button in the Actions Panel, and name the action something meaningful. In our case, we will name it: "Save as JPG - High Quality."
Next, click on the Record button to start recording the steps.
Go to File > Save As...

In the Save As dialog, change the file type to JPEG. It doesn't matter, which location or which name you give your file, as the batch process will override this anyway. Click on the Save button to proceed.
For the JPEG options in the next dialog, set the Image Quality to 12, and click OK.
Now click on Stop in the Actions Palette, to stop recording the action.
If you usually save your output in other formats, you can create Photoshop actions for these as well.

Combining Multiple Photoshop Actions To Use Them For Batch Processing
Those of you who have already tried to batch process images in Photoshop will now that it is only possible to run one action when you set up batch processing. However, there are many cases where you might want to run several actions for each image included in the batch process.
You might want to run different Photoshop actions provided by different PS action manufacturers and apply them to each image. It could also be, as in our case, that you want to keep your actions as flexible as possible and therefore separate them into several smaller actions that you combine from time to time.
Let us take a look at how to combine several actions into one that can be used for batch processing.
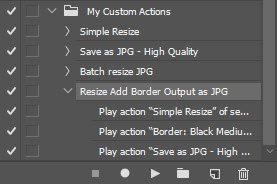
Begin by pressing the Create New Action button. We can name it, "Resize Add Border Output As JPG."
Next, press the Record button to begin.
Now you should include each of the actions you want to combine into a single action, by first selecting the action and then pressing the Play button in the Actions Palette You will record a step that plays another Photoshop Action.
You should do this for each action you want to include. In our case, we will combine three Photoshop actions into one:
Simple Resize action
Border Photoshop action (from our Photoshop Actions for Photographers Package)
Save as JPG - High-Quality action
When you have selected each action and pressed the play button right after selecting each of them, then you have created a Photoshop action that will run these other actions, which is very useful for batch processing in Photoshop.
Note that all the above, with creating Photoshop actions, can be seen as a preparation for the actual batch processing. Even though it is a thorough explanation, it will likely only take a minute or two to set up and test, once you have tried it a couple of times. This, of course, also depends on how complex a Photoshop action, you plan to run.
Setting Up The Batch Process To Run The Photoshop Action
Let us continue with setting up the batch process, which is quite easy.
In general, we need two folders for running batch processes in Photoshop. One folder with the original photos you want to process as a batch using the actions created above. The other folder is where Photoshop will save the files as the batch job processes them.
In Photoshop go to File > Automate > Batch.
Changing the Settings in the Automate Batch Dialog Box

In the Batch dialog box, you will see a section called Play. This is where you select which Photoshop action should run or play for each image in the batch job. First, you must select the right Action Set, and then the actual action. Note that you can only select a single action, which is why I showed you how to make one Photoshop actions run several other actions above.
Change the Source Folder
In the Source section, you should select the folder, which contains all the files. Alternatively, you can also tell Adobe Photoshop to use all opened files, selected photos from Adobe Bridge, or images imported directly from your digital camera.

source folder content for batch job in Photoshop
These are all the images Photoshop will resize, add a simple border to, and finally apply the Photoshop action: save as jpeg.
Per default, Photoshop will Stop for Errors the batch process, if it runs into an error. However, if you have a huge number of files, you can tell Photoshop to instead log errors in a log-file, which you can check later and find the issues with any photos, which might fail during the batch process.
Change the Destination Folder
In the Destination section, you should point to a single folder, where you want to save the processed images. Avoid using the same folder as the source folder, because you might end up overwriting your original files if you don't alter the name of the original file under File Naming. I prefer to create a new folder for each batch process, I run.
You can tell Photoshop not to save the batch-processed photos, but instead, let the action control how to save the image (like we are doing above). In this way, you suppress all the Save As dialog windows, so you avoid choosing the destination for each photo.
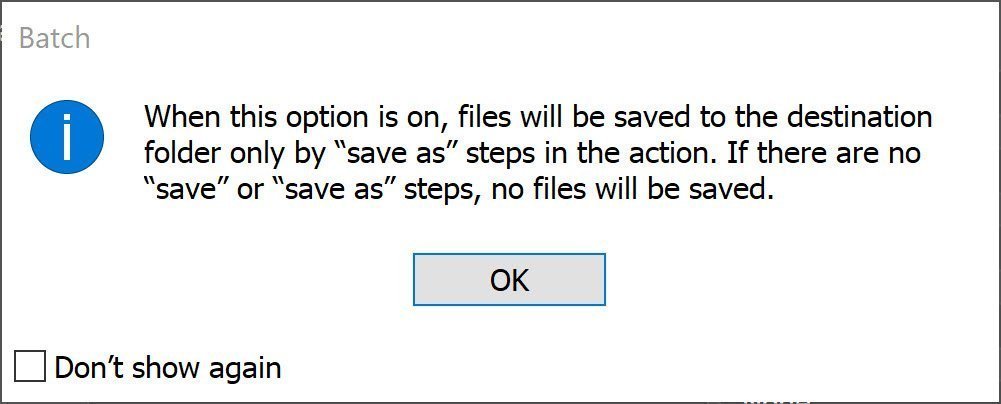
Override Action Save As
The way to do that is to check the "Override Action 'Save As' Commands. A message will let you know that if you don't include a Save As step, your image will not be saved. Photoshop will only open the image, run the Photoshop Action, and then close the image again without saving it.
In the Photoshop batch automation dialog, you can also create your own naming template or formula where you combine the document (image) name, with serial number or counter, and date or custom fields. You can use any combination you wish, as you can see below:
Batch processing dialog in Photoshop - Select which action to use
When you press OK, to start the batch process, Photoshop starts to open each photo in the source folder, apply the chosen action to it, and automatically create the photo in the destination folder, using the file naming options you specified.
You can watch and enjoy the process, or you can minimize the Photoshop application window if you have a huge amount of photos that Photoshop has to process in this batch.
When the batch job in Photoshop finishes, you can find all the processed photos (resized images) in the destination folder.

Batch processed photos using Photoshop actions
The destination folder with the processed files, including a border. Look at the custom naming we told Photoshop to give them in the file naming section.
Concluding words
Photoshop CC has a lot of features for optimizing your workflow, including batch editing multiple files and save them to an empty folder.