Do you want to automate some of the things you do over and over again in Affinity Photo? Or do you want to be able to apply a specific look with a single click and use this as your starting point? In this Affinity Photo macro tutorial, we will show you how to create your automated macros in Affinity Photo.
Using macros enables you to skip a lot of the basic steps that you apply to all images of a specific type. For instance, when dodging and burning, I use a non-destructive approach which involves creating a layer with 50% gray and using a white or dark brush to dodge and burn the images.
This allows me to simply hide the dodge and burn layer if I should decide to regret the changes at a later point or I can change the dodge and burn applied at any stage during my post-processing workflow. By using Affinity Photo macros, multiple step becomes almost a one-click solution before you are ready to dodge & burn.
Download our Free ebook: Quick Start Guide to Affinity Photo
Before being able to use this non-destructive dodge and burn technique, you need to create the layer and do some initial steps, and you need to do this each time you begin working on a new image. However, if you record these steps as a macro, you can skips these steps and instead simply click on the macro.
Affinity Photo will then perform the steps for you, so you can skip to dodge and burning immediately. There are many other techniques where you can take shortcuts by creating macros, but in this post, we will record the dodge and burn technique as a macro.
If you want to build your editing skills in Affinity Photo and use a professional workflow for editing your image, take a look at the Affinity Photo Workflow Video Course.
Enable the Macro and Library Panel in Affinity Photo
If you haven’t used macros before in Affinity Photo, you first need to enable the macro and library panel in your workspace. To enable the panels just go to View > Studio > Macro. This will bring up the macro recorder panel. In this panel you have the control button that lets you record, stop and play a macro.

Next, go to View > Studio > Library to enable the macro library panel. The macro library panel is where you can view all your recorded macros.
How to Record a Macro
To record macros, switch to the macro panel and then hit the record button. Everything you do from now on and until you click the stop button will be recorded in the macro.
If you want to follow along with the sample used in this post, you should do the following before you hit the stop button:
Create a new pixel layer, by clicking on the New layer button in the bottom right corner of the Layers panel.
Double-click on the layer name and change it to “Dodge and Burn Layer”.
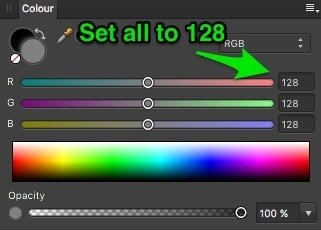
Choose the Flood Fill tool and change the foreground color to R 128, G 128, B 128 (which adds up to a 50% neutral gray color). Click on the image with the new pixel layer activated to fill the layer with the neutral gray color.
Change the blending mode of the layer to “overlay”.

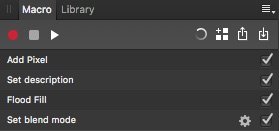
With these steps done, you are ready to hit the stop button to end recording. That was easy right? Below you can see the different steps that you did in the above description.
Now for fun sake delete the Dodge and burn layer from the layers panel so we can test that our macro works as intended. With the layer deleted, click on the Play button in the Macro panel. This will replay the macro and create the dodge and burn layer with a single click.
The little cogwheel next to “Set blend mode”, in the macro panel above allows you to either change the settings for the recorded macro or to enable changing the blend mode whenever you run the macro.
In this example it doesn’t make sense, as changing the blend mode, would not give an invisible dodge and burn layer, but instead, darken or brighten the entire image. However, with other macros, it is a good idea to enable some settings to be changed whenever you run the macro, like sharpening strength or the opacity or radius of an effect. This will make your macros more general and you can, therefore, use them on more of your photos.

To actually test what this new dodge and burn macro does, select the layer mask and hit B to activate the brush. Now you can paint on your photo with a white brush on the areas that you want to dodge, and with a black brush on the areas, you want to darken. Since dodge and burning are done on its own layer you don’t mess up the original image and you can come back and change it at any time in the process.
After testing the macro, you can push the Add to Library button ![]() to save the macro and move it over to the Library. In the window dialogue that appears, you will be able to give the macro a name and select which category you want the macro to belong to.
to save the macro and move it over to the Library. In the window dialogue that appears, you will be able to give the macro a name and select which category you want the macro to belong to.
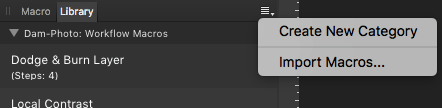
In the library panel, you can create categories to store different types of macros and keep them organized. To do this click on the fly-out menu (on the right side of the library panel), and click Create New Category. After creating the new category, you can drag and drop the macros that you wish to have in this category.
The ability to record macros in Affinity Photo was added in version 1.5. Even though you can record most steps or actions that you perform, there are still some specific steps or actions that you cannot record as a macro in Affinity Photo, which will hopefully be fixed in the next version.
Instead of recording your own macros, you can also let me do the work for you. I have created a number of macros for Affinity Photo, which I have bundled together into macro packs the Affinity Photo Macro Package and Affinity Photo Macros – Evolve Package. You can import these macros, and use them in your daily post-precessing workflow. You can see all the adjustment layers and modify each settings directly in each individual layer, or by the macro sliders available for some macros.
Below you can take a look at the macro package, also for inpiration about what is possible to create using macros. Most macros enables you to perform editing tasks which usually consist of between 5-20 steps, with a single click and a little fine tuning, if necessary.
Take a closer look at the macro packages below
-
Product on sale
 Affinity Photo Macros 2: EvolveOriginal price was: $ 21.00.$ 16.00Current price is: $ 16.00.
 -
 Affinity Photo Workflow – Video Course$ 34.00
 -
Product on sale
 Affinity Photo Macros for PhotographersOriginal price was: $ 21.00.$ 16.00Current price is: $ 16.00.
Is there any way to enable macros in develop module?
Hi Amadeusz,
No, I don’t believe there is. The develop persona is only for raw development of images, and it seems like Serif views it as a preliminary step for the actual processing. But it would be nice actually to be able to run macros straight from the develop module.